
How to Use Track Changes in a MS Word Document
- Deborah Taylor
- Jul 25, 2023
- 4 min read

Updated: Aug 30, 2023
Accepting and Rejecting Track Changes in Microsoft Word: A Client's Guide to Navigating Annotated Documents.

Good communication is a vital aspect of any business, and written documents, such as manuscripts, blogs or product manuals, play a crucial role in conveying ideas and information. When collaborating with a proofreader or editor, it is common to receive annotated documents filled with suggested changes, comments, and revisions. Microsoft Word's Track Changes feature provides a powerful tool for managing these modifications, enabling seamless collaboration and efficient document refinement.
When I have completed your project, I will send you:
The original document you sent to me usually named: Filename_Original.
A second file named: Filename_Tracked
And lastly, one named: Filename_AcceptChanges.
This will allow you to see the document at the start (without annotations), with changes (annotations) and the last one for you to accept or reject each of those annotations.
In this blog post, I will guide you through the process of using Track Changes in MS Word, empowering you to effectively review, accept or reject changes. Let's dive in!
Understanding Track Changes
----------------------------------------------
Before we delve into the practical aspects, let's gain a fundamental understanding of Track Changes. Essentially, Track Changes is a feature in MS Word that records any modifications made to a document, allowing users to easily identify and review those changes. When enabled, Track Changes automatically tracks every addition, deletion, or formatting alteration made by the proofreader or editor and highlights them in a visually distinctive manner. This feature streamlines the review process, making it easier for clients to accept or reject suggestions, leave comments, and collaborate effectively.

Step 1: Opening the Annotated Document
----------------------------------------------------------
Once you receive an annotated document from your proofreader or editor, begin by opening it in Microsoft Word. Ensure that you have a compatible version of MS Word, preferably one that supports the Track Changes feature. I use Microsoft 365 Apps for Business. With the document open check which tab you have selected. Usually the ‘Home’ tab is selected by default (see Image 1), you want to have the ‘Review’ tab open (see Image 2) to be able to accept or reject any changes.
Looking at the document, you will notice that the changes made by the editor or proofreader are visually marked, providing a clear indication of what has been modified. They are either shown as revisions made 'In-line' or in 'Balloons'. To chose how you want to see them use the 'Mark-up Options' button.

Step 2: Reviewing the Changes
------------------------------------------------
With the annotated document opened, it's time to review the changes suggested by the proofreader or editor. Make sure you are either in the Editing Mode or Reviewing Mode found at the top right of the navigation menu (see Image 3). To make the process more manageable, take advantage of the Track Changes feature's built-in options for navigating and filtering revisions. The "Next" and "Previous" buttons allow you to move through the document, highlighting each change one by one. Additionally, you can use the "Accept" and "Reject" buttons to make decisions on individual modifications.

Microsoft have launched a new ‘Track Changes cards’ (July 2023) where you can review the suggested change in the card that pops up by clicking on the word; then hover over the Accept (tick) or Reject (X) button to see a preview of what that action would look like in your document text. This preview feature only functions in Word for Windows at the moment.
Step 3: Accepting or Rejecting Changes
--------------------------------------------------------
As you navigate through the document, you will encounter various modifications made by the editor. The "Accept" and "Reject" buttons play a crucial role in accepting or discarding those changes. By clicking "Accept," you confirm the editor's suggestion, incorporating it into the final version of the document. Conversely, selecting "Reject" keeps the original text intact, disregarding the editor's amendment. Take the time to carefully consider each change, ensuring the document meets your desired standards. Using the v arrow alongside the button, you can 'Accept and Move to Next', 'Accept This Change', 'Accept All Changes', or 'Accept All Changes and Stop Tracking'. Or 'Reject and Move to Next', 'Reject This Change', 'Reject All Changes', or 'Reject All Changes and Stop Tracking'. Remember, this is your project and you are in control of any changes made. (See Image 3).
Step 4: Leaving Comments
-------------------------------------------
During the review process, you might have questions, suggestions, or concerns about specific edits made by the editor. MS Word's Track Changes feature allows clients to leave comments directly within the document, giving you effective communication with the editor. To leave a comment, select the text related to your query or add a comment directly on the side panel. (See Image 4). Use this feature to leave your thoughts and collaborate seamlessly.
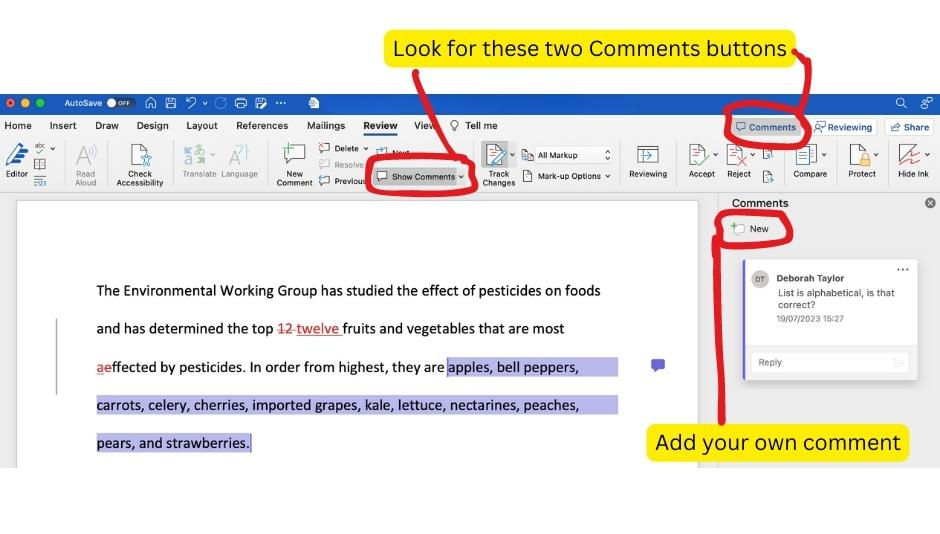
Step 5: Responding to Comments
-------------------------------------------------
In addition to leaving comments, your editor may have raised queries or requested clarifications within the document. It is essential to respond to these comments promptly, providing the necessary information or engaging in a dialogue. To reply to a comment, click on it and utilise the "Reply" button or type your response directly in the side panel. (See Image 4). This interactive process ensures a thorough review and enhances the overall quality of the document.
Conclusion
-----------------------------
Mastering MS Word's Track Changes feature empowers clients to efficiently review, accept or reject changes, and communicate with editors, resulting in refined and polished documents. By following the steps outlined in this guide, you can navigate annotated documents effectively, contributing to a seamless collaborative process. Remember, effective communication and a willingness to engage with the editor's feedback are key to producing exceptional written work.
Disclaimer: I am not an expert, nor am I claiming that this is the only method to do Track Changes in MS Word. This blog is meant to be for educational purposes only and was made for my clients to gain a better understanding of the proofreading process when using Microsoft Word. I will link other resources that you might find helpful (especially if you are a visual learner) below. Please feel free to leave a comment with any tips or resources that you have found helpful.


Very helpful guide! Track Changes can be a lifesaver for collaborative editing and document reviews.
Visit Now: https://wcss.com/